ComfyUI
ComfyUI is a free program for making images in a browser. A workflow in it is a graph of nodes, boxes that each do one part of the work, such as loading the model, running the steps or saving the image. The gmlx nodes, a node pack that ships with gmlx, run the gmlx image models on the gmlx server, and ComfyUI's own nodes work with them. Like the rest of image generation, it needs a Mac with an M3 chip or newer.
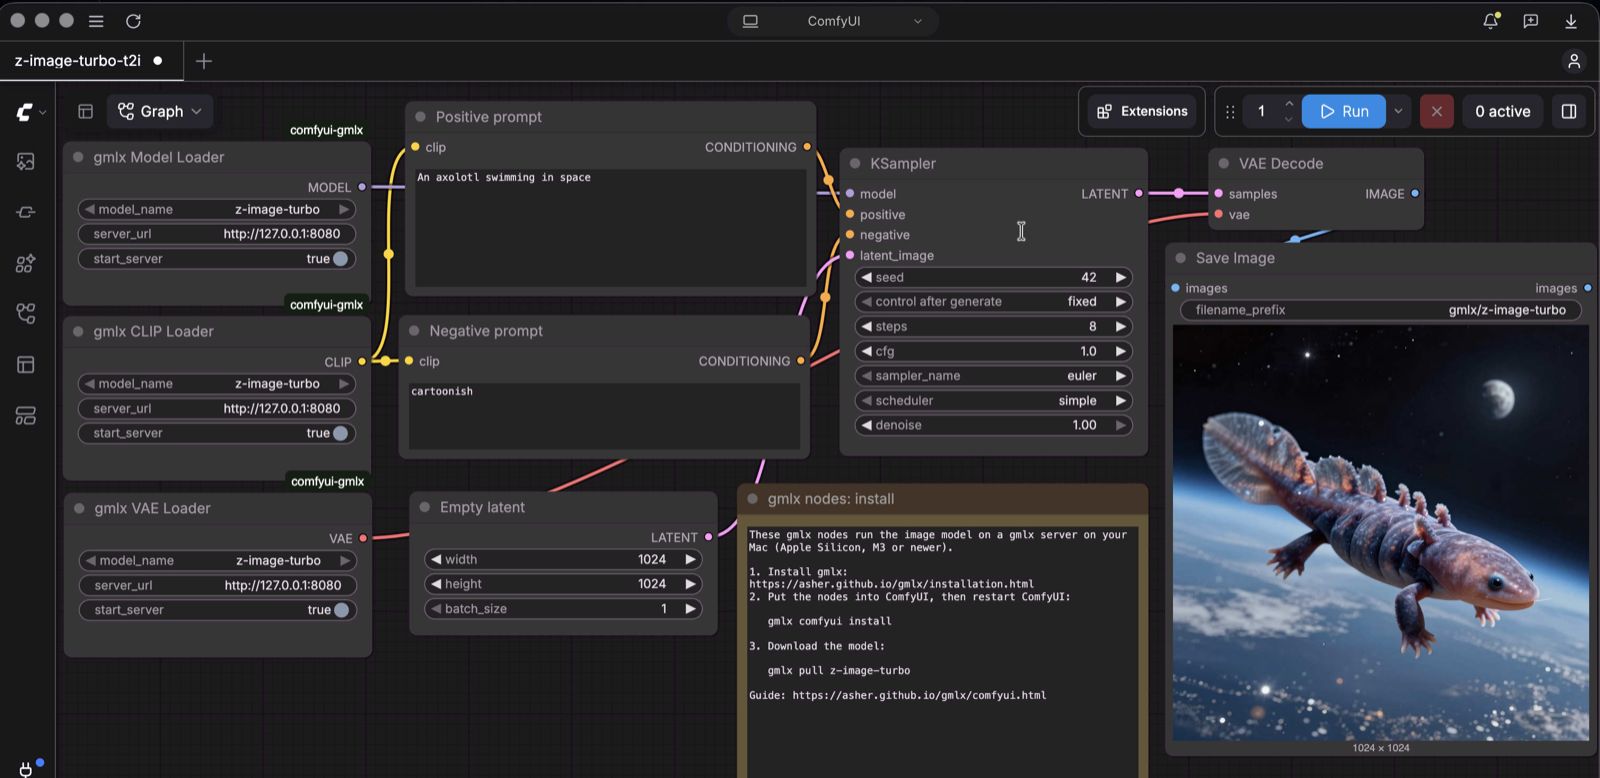
With ComfyUI on your Mac, this command puts the gmlx nodes into it:
Without ComfyUI, get it first. The ComfyUI reference has the launch options, how the nodes find the server and what they refuse.
Get ComfyUI
ComfyUI is a separate program, and gmlx does not install it. Get it one of two ways.
Comfy Desktop is ComfyUI as a Mac app. Download it from
comfy.org/download, open it and create an
install. Desktop starts ComfyUI itself, so you start the app, not
gmlx launch comfyui.
A ComfyUI folder is a clone of ComfyUI with its environment in a .venv
folder, which gmlx launch comfyui starts for you. These commands put it
in ~/ComfyUI, where launch looks for it, using
uv for Python:
brew install uv
git clone https://github.com/comfyanonymous/ComfyUI ~/ComfyUI
cd ~/ComfyUI
uv venv --python 3.12 .venv
uv pip install -r requirements.txt
ComfyUI's requirements include PyTorch, so the environment takes about 1.7 GB. The gmlx nodes need ComfyUI 0.37 or newer and no Python packages beyond ComfyUI's own.
Put the gmlx nodes into ComfyUI
gmlx comfyui install finds ComfyUI in these places:
| ComfyUI | Where its custom_nodes folder is |
|---|---|
| A clone | ~/ComfyUI/custom_nodes |
| comfy-cli | ~/Documents/comfy/ComfyUI/custom_nodes, or in the default or recent workspace that comfy-cli's config names |
| Comfy Desktop | ComfyUI/custom_nodes in each install's folder, which is in ~/ComfyUI-Installs unless you moved it |
| The old ComfyUI desktop app | The custom_nodes folder in its base folder, by default ~/Documents/ComfyUI |
With more than one, it lists them and asks for --comfyui-dir. Run it once
for each ComfyUI that should have the nodes. A ComfyUI that you add later
needs --comfyui-dir too, and install names the command for it:
gmlx comfyui install --comfyui-dir ~/ComfyUI
gmlx comfyui install --comfyui-dir ~/ComfyUI-Installs/Stable
install refuses a ComfyUI older than 0.37 with the steps that update
it. The old desktop app keeps a ComfyUI that old, so for it the step is
Comfy Desktop. Then install copies the gmlx nodes to
~/.local/share/gmlx/comfyui and links custom_nodes/comfyui-gmlx to that
copy, so every ComfyUI shares one copy. A folder of that name that is not
gmlx's link, such as a clone of the old ComfyUI-gmlx repository, moves into
custom_nodes/.disabled, where ComfyUI skips it. Last, it records the
install in ~/.config/gmlx/comfyui.json. Restart ComfyUI if it is running,
so it loads the nodes. gmlx comfyui status and gmlx doctor show where
the nodes are and whether each ComfyUI's version fits them, and
gmlx comfyui lists the flags.
Comfy Desktop
gmlx comfyui install reads Comfy Desktop's list of installs, so it finds
an install wherever you put it. After it runs, restart the app, or start
it, from the Dock.
gmlx manages the gmlx nodes, and they update when gmlx does. They do not show in Desktop's list of custom nodes or in its snapshots, and restoring a snapshot leaves them in place. ComfyUI-Manager lists them as an unknown pack and cannot update them, which is expected. Comfy Desktop installs has the details of migrated and managed installs.
Make your first image
Download Z-Image-Turbo, then start ComfyUI:
pull adds the model to your configuration, as
Make your first image describes.
launch puts the gmlx nodes into ComfyUI, starts the gmlx server when none
is running, then starts ComfyUI. Among its lines it prints:
[launch] installed the gmlx nodes in ~/ComfyUI/custom_nodes/comfyui-gmlx (a ComfyUI folder, ComfyUI 0.39.2)
[launch] ComfyUI runs at http://localhost:8188, which you open in a browser, from /Users/you/ComfyUI.
With Comfy Desktop, run gmlx comfyui install in place of launch, then
start the app. The loaders start the gmlx server when none is running.
Open ComfyUI in the browser, or in the app, then open the example workflow:
- Click Templates in the left sidebar.
- At the bottom of the list on the left, click Extensions, then
comfyui-gmlx. The template search does not find these templates. - Click
z-image-turbo-t2i.
Or drag custom_nodes/comfyui-gmlx/example_workflows/z-image-turbo-t2i.json
onto the page. Press Run. The first run waits while the server loads the
model. If you skipped gmlx pull, the run stops with an error that gives
the pull command; run it, then press Run again.
The image shows in the Save Image node, and ComfyUI saves it as
gmlx/z-image-turbo_00001_.png in its output folder, counting up with
each run. To make another image, change the text of the Positive prompt
node and press Run again. Stop ComfyUI with Ctrl+C in the terminal where
launch runs. When a command stops with an error,
Troubleshooting has the fix.
The nodes you use
The first workflow has these nodes, under the titles they show:
| Node | What it does |
|---|---|
gmlx Model Loader |
Loads the DiT of the image model picked in model_name. server_url shows the server's address. |
gmlx CLIP Loader |
Loads the model's text encoder, which ComfyUI calls CLIP. |
gmlx VAE Loader |
Loads the model's VAE. |
Positive prompt |
What to make. |
Negative prompt |
What to steer away from. It has no effect at cfg 1. |
Empty latent |
The image's width and height. |
KSampler |
The seed, the steps, the cfg (guidance) and the sampler. |
VAE Decode |
Turns the result into pixels. |
Save Image |
Shows the image and saves it in output, named by filename_prefix. |
The model_name list of each loader holds the image models in the gmlx
server's config. Before you pull one, it holds only the default model's
name, and a run with it stops with its pull command. After a
pull, press R in ComfyUI to refresh the list. The nodes read the list in
the background, so if the model is not there yet, press R again a few
seconds later. A new loader's server_url shows the address the nodes
found, as
How the nodes find the server
describes.
There are two more gmlx nodes. gmlx Sigmas gives the fixed schedule of a
distilled model such as Qwen-Image 2.1 Turbo, for SamplerCustom or
SamplerCustomAdvanced, though KSampler works on every model.
gmlx Server Status shows whether a model is loaded, the memory it holds
and the gmlx version of the nodes. The
ComfyUI reference says which
stock nodes work with a gmlx model and what runs where.
The example workflows
ComfyUI's template browser lists three workflows under comfyui-gmlx. Their
files are in custom_nodes/comfyui-gmlx/example_workflows. Each has a note
with the commands that install the gmlx nodes and pull its model.
| Workflow | What it does | Needs |
|---|---|---|
z-image-turbo-t2i |
Z-Image-Turbo text to image at 1024x1024 in 8 steps | Nothing beyond the model |
z-image-turbo-lora-t2i |
The same through a stock LoraLoader |
A Z-Image LoRA named z-image-turbo-style.safetensors in models/loras, or another picked in the node |
qwen-image-2.1-edit-two-references |
A Qwen-Image 2.1 edit from two reference images, through TextEncodeQwenImage21 |
gmlx pull qwen-image, and reference-1.png and reference-2.png in ComfyUI's input folder |
LoRAs
Put a LoRA's .safetensors file in ComfyUI's models/loras folder. A file
added while ComfyUI runs shows in the lists after a restart.
Use a LoRA says which LoRAs fit a model. To add one
to a workflow, double-click an empty part of the canvas, search for
Load LoRA (Model and CLIP), which is LoraLoader, and add it. Connect
the MODEL and CLIP outputs of the gmlx loaders to its inputs, and its
outputs to the nodes that the loaders fed before. The gmlx nodes send each
LoRA to the server once, so a change of strength costs one small request.
LoraLoader works at any strength_model. The text encoder half of a
LoRA is not applied in ComfyUI, so set strength_clip to 0. To apply both
halves, use the LoRA with gmlx image generate.
Upgrades
The gmlx nodes come with gmlx, so an upgrade of gmlx upgrades them. The
next gmlx serve, gmlx launch comfyui or gmlx comfyui install replaces
the copy, and the server prints a line when it does. A ComfyUI that was
running keeps the old nodes until you restart it. A new ComfyUI release
can change a part of ComfyUI that the nodes use. Then the nodes show with
(not loaded) after their names, and running one gives an error that
names the change. Upgrade gmlx as it says, such as with
brew upgrade gmlx, then run gmlx comfyui install and restart ComfyUI.
Remove the gmlx nodes
uninstall removes the comfyui-gmlx link from each ComfyUI, the copy in
~/.local/share/gmlx/comfyui and the record. With --comfyui-dir it
removes the nodes from that ComfyUI only, and from the last ComfyUI that
has them it also removes the copy and the record. A folder that it moved
into custom_nodes/.disabled stays there. If gmlx is already gone, the
nodes say so and name the two paths to delete.